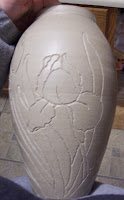
 The only pictures of designed raku pottery I've had up on the blog have been finished ones. I thought it might be kinda cool to see what these pots look like in their raw state.
Here are a few I've been working on that are still very much in progress. One has an iris design and the other, bay magnolia. After studying a subject, whether it be a peacock feather or a particular flower, and making my sketches, I visualize the design layout then carefully carve it into the surface of the "leather hard" clay.

Carving a design into clay is much different than drawing or painting it. The positioning of the tool initially can be tricky and carving, like anything else with pottery, takes practice. After you spend all that time and effort making that pot -- throwing, trimming, and waiting for the clay to be just the right consistency-- you have a lot invested and you don't want to mess up. Once you lay your tool into the clay and make a cut, there is no going back or correcting it, so extra care needs to be taken.
 After the carving is complete, the pot is left to dry usually for about a week or until it is "bone dry". It is then bisque fired, glazed, then fired raku kiln. (Please see my post from July 18th for a description of the raku process).
I will try and post pictures of these pots again once they have been glazed and fired.

No comments:
Post a Comment